04-Linux_QT_Environment_Setup
1. QT Runtime Environment Testing
Ubuntu 20.04
The Ubuntu 20.04 system has the QT 5.12.8 runtime environment pre - configured by default.
To view the QT libraries:
$ ls -l /usr/lib/aarch64-none-linux-gnu/libQt*The test demo is located in the network drive directory:
3-SoftwareData Software Materials\Qt_demo\mainwindowCopy the demo to any directory in the system and conduct the test:
$ sudo chmod +x ./mainwindow
$ sudo ./mainwindowDebian 11
The Debian 11 system has the QT 5.15.2 runtime environment pre - configured by default.
To view the QT libraries:
$ ls -l /usr/lib/aarch64-none-linux-gnu/libQt*The test demo is located in the network drive directory:
3-SoftwareData Software Materials\Qt_demo\mainwindowCopy the demo to any directory in the system and conduct the test:
2. QT Cross - Compilation Environment Setup
Test platform: Virtual machine Ubuntu 20.04
GCC Cross - Compilation Tools
Virtual Machine: You can obtain it from the network drive. The network drive path is:
The SDK comes with a cross - compilation toolchain: (Not recommended as version incompatibilities may occur)
GCC Cross - Compilation Chain Installation Place the obtained compressed package in the virtual machine directory and extract it:
-C /opt/gcc-arm specifies the extraction path.
Environment Variable Configuration To enable the system to recognize the cross - compilation toolchain, you need to add its path to the environment variables.
Temporary Effect (Valid only for the current terminal session) Run the following command:
Permanent Effect Edit the user or system environment variable configuration file.
Verify the installation Run the following command to verify whether the toolchain is successfully installed and configured:
If the output is similar to the following, the installation is successful:
QMake Tool Installation
If you want to install QT on the board, install GCC on the board. There is no need to modify the compilation tools. Just install the source code.
The qmake tool is used to generate MakeFiles for Qt projects based on the project file (.pro). For simple projects, you only need to run qmake in the top - level directory of the project. By default, qmake will generate a MakeFile for building the project. At this time, you can run the platform - related make tool to build the project.
The network drive only provides one version of QT:
Download Qt from the official website Official website links: Unmaintained Qt versions Maintained Qt versions
Visit the official website and select the version you need to download.

Select "single".

Select "tar.xz".

Install dependencies:
After downloading, extract it in the /opt folder:
After extraction, enter the folder and create an auto.sh script file.
Modify the qmake.conf file There are various platforms in the qtbase/mkspecs/ directory of the QT source code. In our example, we use the qmake configuration file in the linux - aarch64 - gun - g++ directory. However, since the cross - compilation tools are different, we need to modify the qmake.conf file to adapt to the tools.
Run the script to cross - configure the QT source code:
The script is used to execute ./configure -prefix /opt/Qt/ \ Qt installation path -opensource -confirm-license \ Installation version, community edition or commercial edition -nomake examples \ Do not compile and install examples -nomake tests \ Do not compile and install tests -release \ Release compilation -xplatform \ Specify the target platform -skip \ Skip compiling modules
qtlocation and qtwebengine. If you don't particularly need these two modules, it is recommended to skip compiling them. These commands are described in the README after extraction. After execution, make improvements according to the prompts. Most of the prompt errors are due to incomplete dependency installation.
Execute the compilation:
It takes a long time, about 4 - 12 hours depending on the performance.
After completion, execute:
This command will install the program in the /opt/Qt/ directory specified by -prefix above. After successful installation, modify the environment variables:
Finally, execute:

Install Qt Creator
You must install Qt first before installing Qt Creator. Compile Qt Creator with Qt. If there is an error in compiling Qt, there will also be an error in this step. If there are uncompiled modules or non - dependent modules during Qt compilation, Qt compilation will not be affected, but Qt Creator will be affected. I tried adding -no - opengl . There was no error in compiling Qt, and the installation was successful, but there was an error in compiling Qt Creator.
You can choose to install the package program on the virtual machine. At the same time, you can install other packages that run on the local machine.

Download it and run the installation program in the virtual machine. It is best to match the Qt Creator version with the Qt version. Qt Creator source code

After downloading, extract it. Assuming the above tutorial has been completed: Enter the extraction path and execute:
Wait for the completion to generate the MakeFile file. Then execute:
Wait for the compilation to complete, and then execute:
After execution, Open the bin folder, and there will be qtcreator and qtcreator.sh. Execute:
In this way, Qt Creator will run in the background. Finally, configure Qt Creator.
QT Cross - Compilation Kit Configuration
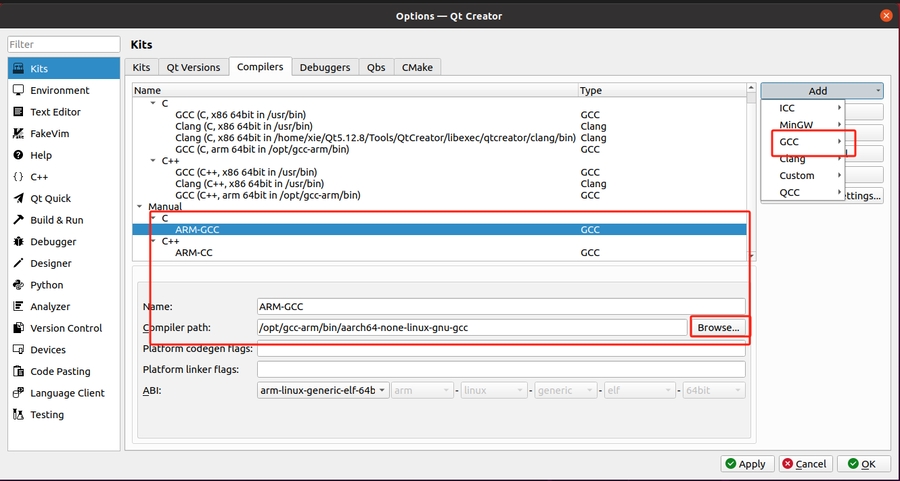
The following introduces the configuration of using cross - compilation tools when creating a QT project in QT. The Kits mainly select GCC and G++ from the cross - compilation toolchain, and use the compiled qmake for qmake.
Add C and C++ in GCC:

Add qmake:

Final configuration:

Last updated